Razer Sensa™ HD Haptics
Enhance your Unity projects with high-definition haptic feedback using the Razer Sensa HD Haptics, supported by Interhaptics Unity Core SDK version 1.5.0 and above.
Requirements
SDK Support: Verify that your project is using Interhaptics Core SDK version 1.5.0 or above to have automatically enabled Razer Sensa HD Haptics support. The Interhaptics Core SDK can be installed via the Unity Package Manager as described in the Getting Started with the Unity SDK chapter.
Compatible Devices: Razer Sensa HD Haptics is compatible with a variety of devices included in the Razer Sensa HD Haptics dev kit.
Driver Requirements: Make sure you have the latest version of the Razer Synapse 4 and Chroma apps for necessary drivers.
Guide: Refer to the standard documentation in the Interhaptics Unity SDK for guidance on adding haptic effects. (Code documentation / No-Code documentation)
Creating a Unity Scene with Razer Sensa HD Haptics
Follow these steps to configure a sample Unity scene using Razer Sensa HD Haptics. In this scene, we will create a sequence of haptic events which will simulate two missing pistol shots targeting the player which will be rendered on a head haptic device on the right side first, left side second, followed by a pistol shot coming from the player's gun.
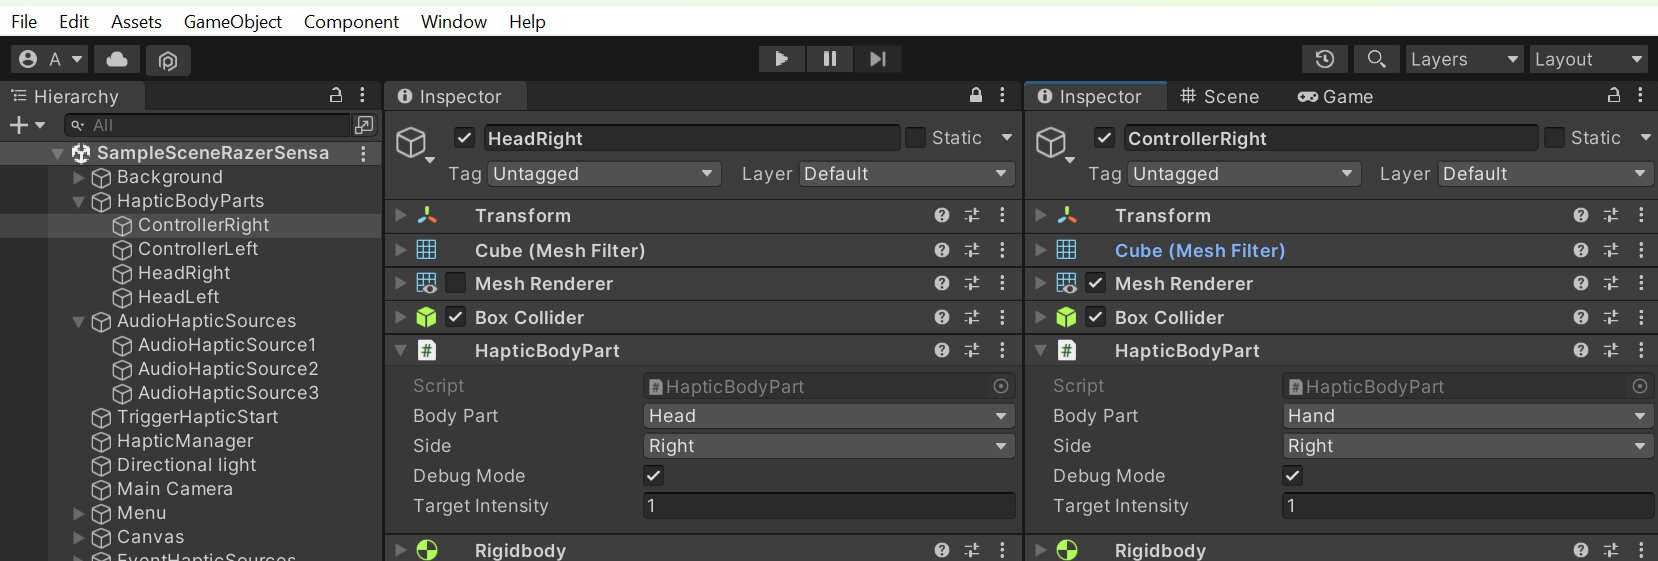
Step 1: Setup Haptic Body Parts GameObjects
-
Create four GameObjects in Unity to represent the left and right sides of haptic-enabled devices, and haptic controllers:
- Head Left
- Head Right
- Controller Left
- Controller Right
- For a devices like the Razer Freyja haptic cushion you can target also the following haptic body parts (Chest, Leg, Waist).
-
Add a HapticBodyPart component to each of the four GameObjects created in Step 1.
-
Within each HapticBodyPart, define the appropriate body part and side (Head and Hand).
Step 2: Add Event Haptic Sources
-
Create corresponding GameObjects to act as the HapticSources.
-
Add an AudioHapticSource component to each emitter GameObject.
-
In the AudioHapticSource component of each GameObject, assign the respective .haps files from the haptic effects library inside the Core SDK located in the folder Assets\HapticMaterials: BulletCrack.haps for the two haptic sources targetting the head, and PistolShot.haps for the haptic source targetting the controller.
-
Within each AudioHapticSource component, link the corresponding HapticBodyPart GameObjects to ensure the haptic feedback is emitted correctly.
-
Assign the associated sound from the Assets\Sounds folder to each of the GameObjects so audio and haptics play in sync when triggered.

Step 3: Create a haptic effect sequence
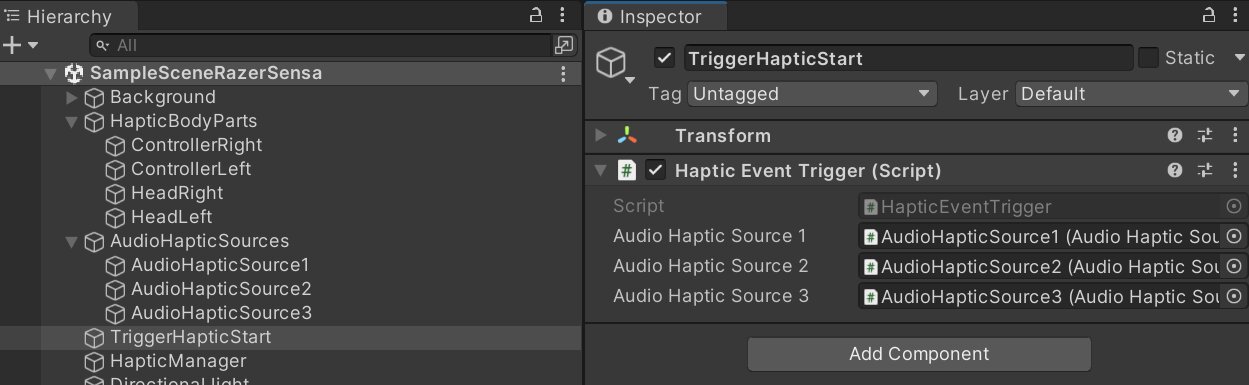
- Create a script in Unity that plays the PlayEventVibration() method on three different EventHapticSource components at different times. Below is a sample script that achieves this:
using System.Collections;
using Interhaptics.Utils;
using UnityEngine;

public class HapticEventTrigger : MonoBehaviour
{
    public AudioHapticSource AudioHapticSource1;
    public AudioHapticSource AudioHapticSource2;
    public AudioHapticSource AudioHapticSource3;

    // Start is called before the first frame update
    void Start()
    {
        StartCoroutine(PlayHapticEvents());
    }

    private IEnumerator PlayHapticEvents()
    {
        // Wait for 0.5 seconds and play the first haptic event
        yield return new WaitForSeconds(0.5f);
        AudioHapticSource1.PlayEventVibration();

        // Wait for an additional 1 second (1.5 seconds in total) and play the second haptic event
        yield return new WaitForSeconds(1.0f);
        AudioHapticSource2.PlayEventVibration();

        // Wait for an additional 1 second (2.5 seconds in total) and play the third haptic event
        yield return new WaitForSeconds(1.0f);
        AudioHapticSource3.PlayEventVibration();
    }
}
-
Attach this script to a GameObject in your scene. Drag and drop the AudioHapticSource components from your GameObjects into the AudioHapticSource1, AudioHapticSource2, and AudioHapticSource3 fields in the Inspector window for this script.
-
When you start the scene, the script will automatically initiate the coroutine, which will sequentially play the haptic events at the specified times.